# Mini-Program Host Environment
FinClip Mini-Programs can run within various types of mobile applications (such as desktop applications and mobile applications). When a Mini-Program is launched, the client provides the necessary runtime environment and capabilities to the Mini-Program. We refer to this set of environments as the "Host Environment (Host-App)". Through the Host Environment, Mini-Programs can achieve many functions that native applications and H5 applications cannot.
# 1. Logic Layer and View Layer
The runtime environment of a Mini-Program can be divided into two parts: the Logic Layer and the View Layer.
The Logic Layer is responsible for loading the JS scripts that handle the business logic within the Mini-Program, while the View Layer is responsible for rendering the FXML templates and FTSS styles to display the final page. In a Mini-Program, the Logic Layer and the View Layer are managed by two independent threads:
- The Logic Layer uses the JS Core engine to run JS scripts, handling business logic;
- The View Layer interface is rendered using WebView (if a Mini-Program contains multiple pages, there will be multiple WebView threads).
Therefore, a Mini-Program application has only one JS Core thread and multiple WebView threads.
The overall runtime environment and communication model of the Mini-Program are shown in the following diagram:
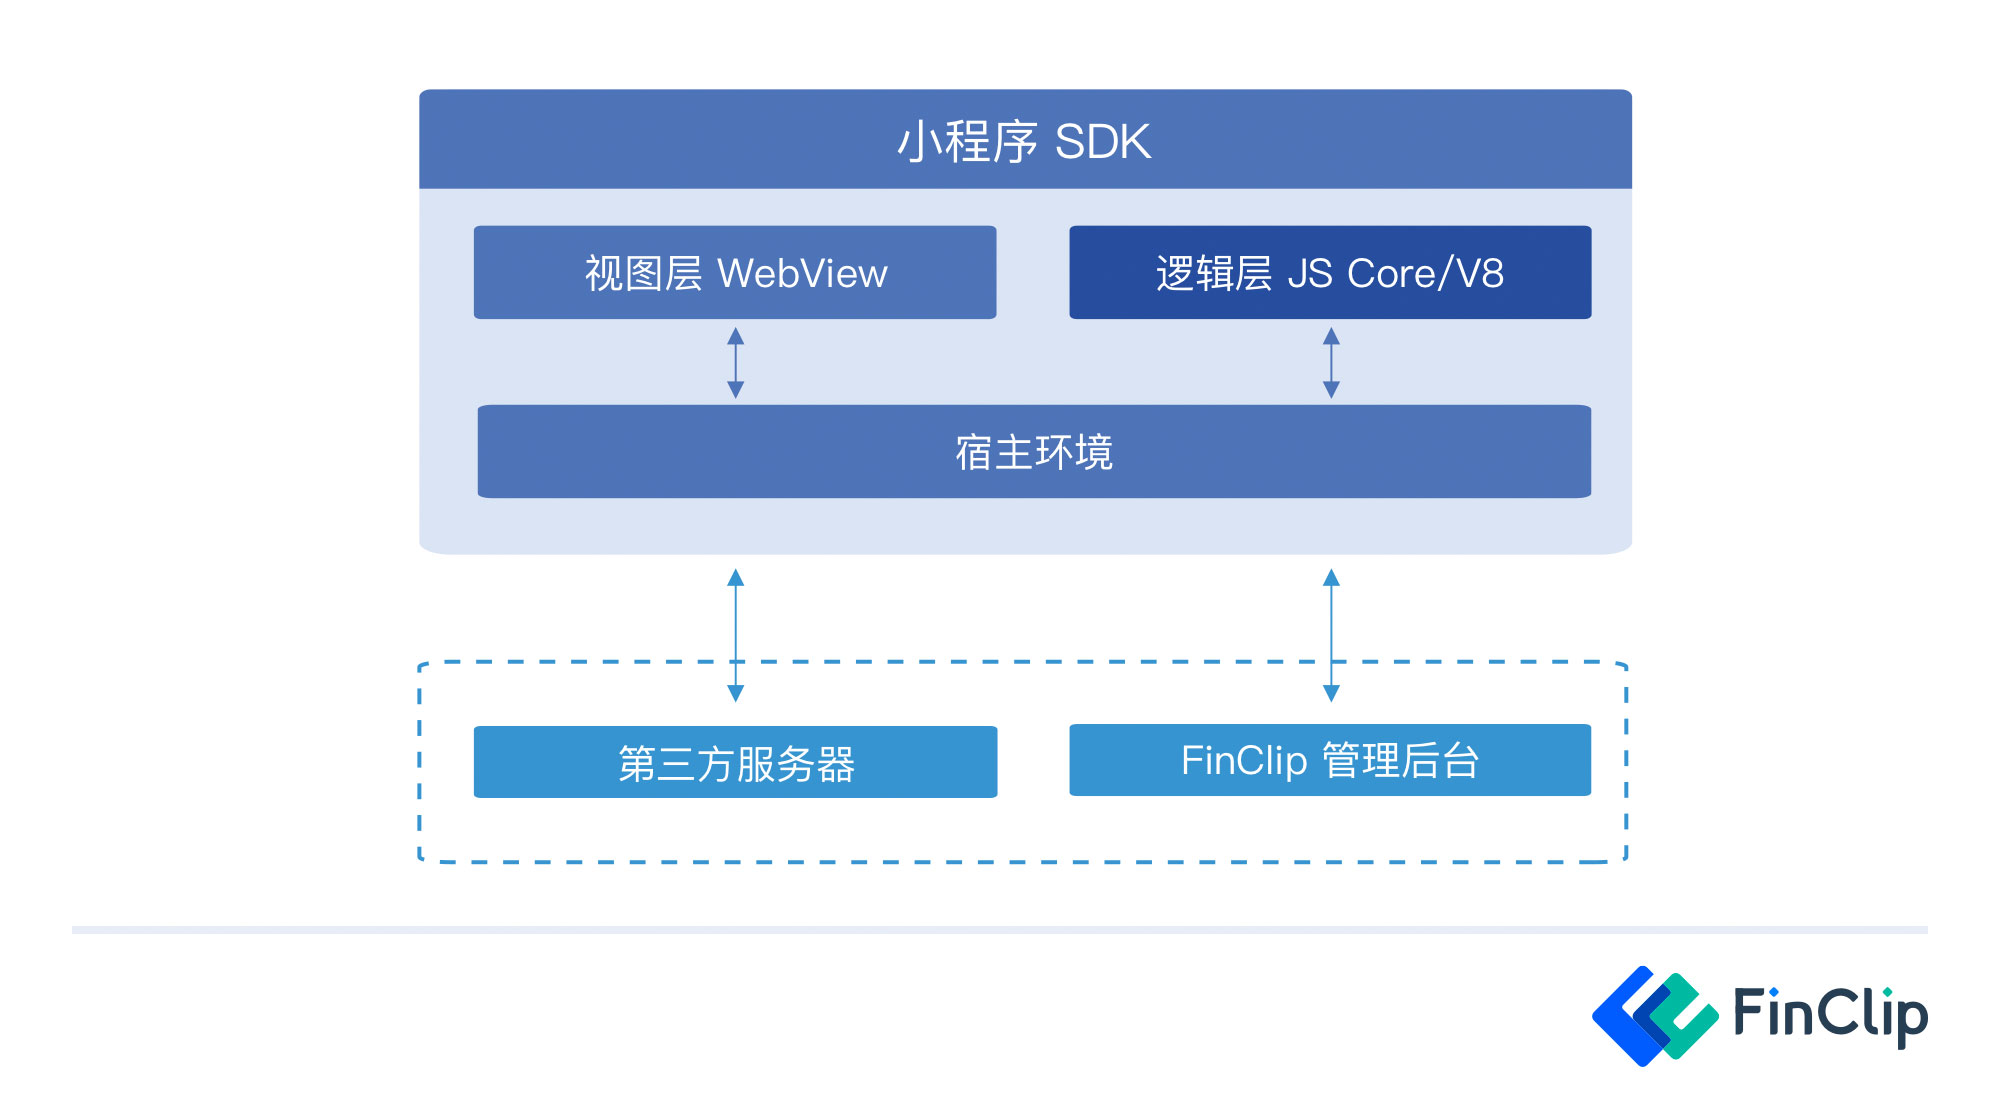
As the Host Environment, the mobile or desktop application needs to interact with both the Logic Layer and the View Layer. These two layers cannot communicate directly with each other; communication must occur through the Host Environment.
# 2. App and Pages
When a Mini-Program is opened within the Host-App, its code package is first downloaded locally. Then, by parsing the pages field in app.json, all the page paths of the Mini-Program can be identified:
{
  "pages":[
    "pages/index/index",
    "pages/logs/logs"
  ]
}
The first value in the pages array is the first page seen when the Mini-Program is opened. For each page path, the corresponding file path can be found within the program code package.
For example, for pages/index/index, under this path, the corresponding FXML, FTSS, and JS files for this page exist. After the Mini-Program starts, it locates the code files for the corresponding page based on this path, then hands them over to the Logic Layer and View Layer for execution. Thus, we can see the Mini-Program's page on the Host-App.
Once the Mini-Program starts, the onLaunch method defined in app.js is triggered.
App({
  onLaunch: function () {
    // Executed after the Mini-Program starts
  }
})
Let's look specifically at the page structure and composition of a Mini-Program, using pages/index/index as an example. In this file directory, index.js, index.fxml, and index.ftss exist.
// Contents of index.js
// Get the application instance
const app = getApp()

Page({
  data: {
    motto: '',
  },
  // Event handler function
  bindViewTap() {
    ft.navigateTo({
      url: '../logs/logs'
    })
  },
  onLoad() {
    this.setData({
      motto: 'hello world'
    })
  }
})
In the index.js file, Page({...}) constructs the index page instance. data represents the rendering data needed for this page. When the page is generated, the Mini-Program engine combines the data with index.fxml and renders it for display to the user.
The onLoad() method is a lifecycle method of the page. This method is called back when the page is created, allowing developers to define their own logic within it.
For more information related to code structure, please refer to FinClip Development Documentation - Code Structure
# 3. Components
Components are provided by the Mini-Program for developers to create page UI and customize FXML. Developers can flexibly combine various components to build their own page UI.
What is a component:
- Using components in FXML is the basic building block of the View Layer.
- A component typically includes a start tag and an end tag. Attributes are used to modify the component, and content is placed between the two tags.
Note: All components and attributes are lowercase and connected by hyphens.
Just like HTML tags, in a Mini-Program, developers write the corresponding component tags in FXML to display them. For example:
// Contents of index.fxml
<view class="intro">Welcome to FinClip</view>
This page displays a line of text: Welcome to FinClip. Developers can control the style of this component using style and class to specify width, height, color, etc.
For more information related to components, please refer to FinClip Development Documentation - Component Overview
# 4. API
To make it more convenient for developers to utilize the capabilities provided by the Mini-Program, FinClip offers various APIs for developers to use. Developers can use these APIs to modify the Mini-Program interface, obtain the device's current location, play video, audio, etc.
APIs are divided into synchronous and asynchronous types. Synchronous APIs return results directly, while asynchronous APIs return results through callbacks. Developers need to handle the logic according to the API's callback method and pass the correct parameters to handle the business.
For example, setStorageSync is a synchronous API, and setStorage is an asynchronous API:
ft.setStorage({
  key: 'key',
  data: 'value'
})

try {
  ft.setStorageSync('key', 'value')
} catch (e) { }
For more information related to APIs, please refer to FinClip Development Documentation - API Overview